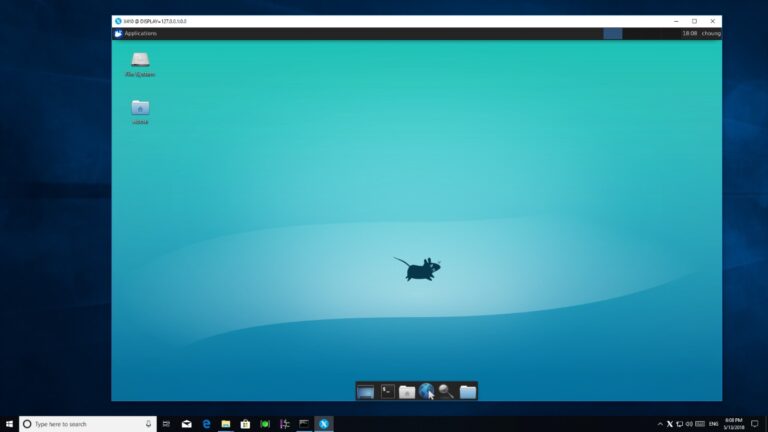
The objective of this tutorial is to install the Xfce desktop environment and to install Chrome Remote Desktop on an Ubuntu 20.04 headless server and access it via Google Chrome.
Google Chrome Remote Desktop is a tool for remote access to computers. The protocol uses an unofficially named proprietary technology called Chromoting.
For this scenario, it is recommended that you use an Ubuntu 20.04 server with a minimum of 2GB of RAM. Also a non-root sudo user. In case you don’t take proper precautions, you could end up causing harm to your system by being logged in as root.
Step 1: Create a Sudo User
Performing server administration as a non-root user is a best practice for maintaining security. The first thing you need to do as root after launching your server is to set up a non-root user with sudo access.
1.1. Add a New User Account
Create a new user account with the adduser command. I have used demouser as an example. Please change the username as your requirement. Use a strong password for the new user. You can enter values for the user information, or press ENTER to leave those fields blank.
This is how the code looks:
# adduser demouser
Adding user `example_user' ...
Adding new group `example_user' (1001) ...
Adding new user `example_user' (1001) with group `example_user' ...
Creating home directory `/home/example_user' ...
Copying files from `/etc/skel' ...
New password:
Retype new password:
passwd: password updated successfully
Changing the user information for example_user
Enter the new value, or press ENTER for the default
        Full Name []: Example User
        Room Number []:
        Work Phone []:
        Home Phone []:
        Other []:
Is the information correct? [Y/n] y
1.2. Add the User to the Sudo Group
Add the new user to the sudo group with usermod.
# usermod -aG sudo demouser1.3. Validate
Switch to the new user.
# su - demouserVerify you are the new user with whoami.
$ whoami
demouser
Then test sudo access with sudo whoami, which should return root.
$ sudo whoami
[sudo] password for demouser:
root
You can now use your new sudo user account. Keeping this sudo user as your server administrator is a good practice. Maintenance tasks should not be performed with root access.
Step 2: Install Chrome Remote Desktop on Ubuntu 20.04
2.1. Update the package index and install wget
$ sudo apt update
$ sudo apt-get install -y wget
2.2. Download the Debian Linux Chrome Remote Desktop installation package
$ sudo wget https://dl.google.com/linux/direct/chrome-remote-desktop_current_amd64.deb2.3. Install the package you just downloaded and its dependencies
$ sudo dpkg --install chrome-remote-desktop_current_amd64.deb
$ sudo apt install -y --fix-broken
Step 3 – Install the Xfce Desktop Environment
So the next step is to install the Xfce desktop environment and window manager that can be accessed remotely with Chrome Remote Desktop.
3.1. Installing Xfce
$ sudo DEBIAN_FRONTEND=noninteractive apt install -y xfce4 desktop-base3.2. Configure Chrome Remote Desktop to use as default for Xfce desktop
The DEBIAN_FRONTEND=noninteractive parameter bypasses the dialog box where you would have to select how you would like the keyboard.
$ sudo bash -c 'echo "exec /etc/X11/Xsession /usr/bin/xfce4-session" > /etc/chrome-remote-desktop-session'3.3. Installing XScreenSaver
Chrome Remote Desktop doesn’t work well with the default screen locker, called Light Locker. The screen goes blank and cannot be unlocked. As an alternative, we’ll install XScreenSaver.
$ sudo apt install -y xscreensaver3.4. (Optional) Installing the entire software suite
As of now, we have installed a minimal version of Xfce. Run the following commands if you would like the Xfce desktop’s full suite of software:
$ sudo apt install -y task-xfce-desktopStep 4: Setting up Google Chrome Remote Desktop
4.1. Add user to the chrome-remote-desktop group
Run the following command to add your user to the chrome-remote-desktop group:
$ sudo usermod -a -G chrome-remote-desktop $USER4.2. Go to remote desktop command line setup page
On your local computer, using your Google Chrome browser, go to the remote desktop command line setup page: https://remotedesktop.google.com/headless. The code can only be accessed after you log in using your Google account. Remote access will be authorized through this account.

Click Begin in the Set up another computer section. A download link for Chrome Remote Desktop will appear on the next page. As we have already installed it, click Next to proceed.
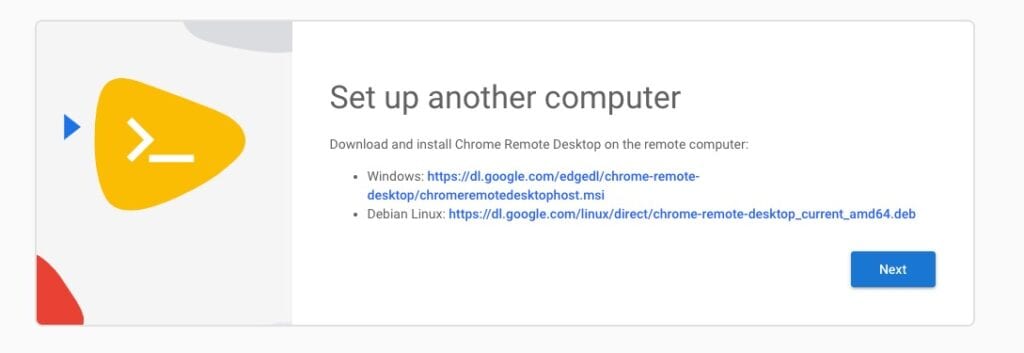
Click Authorize on the next screen. By doing so, you grant Chrome Remote Desktop access to your account.

Depending on your operating system and command-line shell, the page displays the command that you’ll need to run. As we’re using Ubuntu 20.04, which is a Debian-based operating system, we’ll use the Debian Linux command.
Important Note:
You can only use this authorization code once and it is valid for only a few minutes. In this case, if it takes too long between the moment you create the command and running it, then you’ll have to start over.
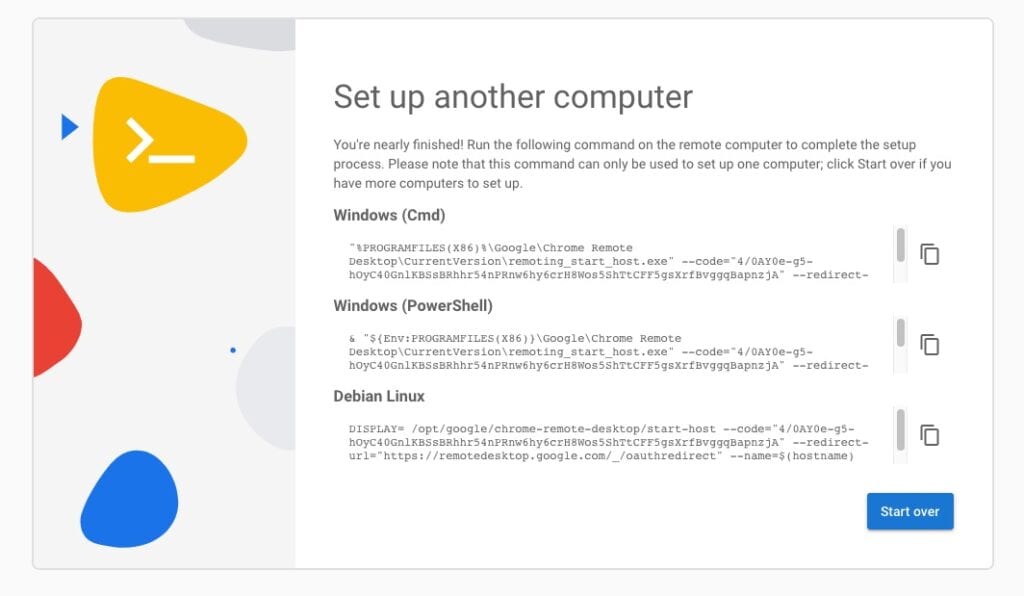
4.3. Run the authorize code provided in the Debian Linux section
If you are asked to give the computer a name, you can choose anything you like. If you are asked to enter a PIN with at least six digits, enter any PIN that you want. When using Google Chrome to connect to the remote desktop, you’ll enter this PIN as a password.
Step 5: Use Chrome Remote Desktop to access the Xfce desktop
5.1. Access to Google Chrome Remote Desktop
Visit the Chrome Remote Desktop website from your local browser. The name of your Ubuntu 20.04 machine should appear in the Remote devices section of the page if the setup was successful. Please log in using your Google account if you are not logged in already.
5.2. Log in to the Xfce Desktop
It should take a few seconds to load, then you will be prompted to enter your six digits’ PIN you set earlier. Enter the pin and click on the blue arrow to log in to your Xfce desktop. Through Chrome Remote Desktop you should now be able to access your Ubuntu 20.04 machine. If you see a black screen with animation, that is the screensaver. To remove it, click anywhere on the screen.
Step 6: Additional Tasks
6.1. Enable Clipboard Synchronization
Clipboard Synchronization allows the contents of the clipboard to be shared between the local and remote machines. If this feature is not already enabled, do the following:
- Open the Session Options panel using the button chevron_left on the side of the window.
- In the Enable Clipboard Synchronization section, click Begin.
- Click Allow.
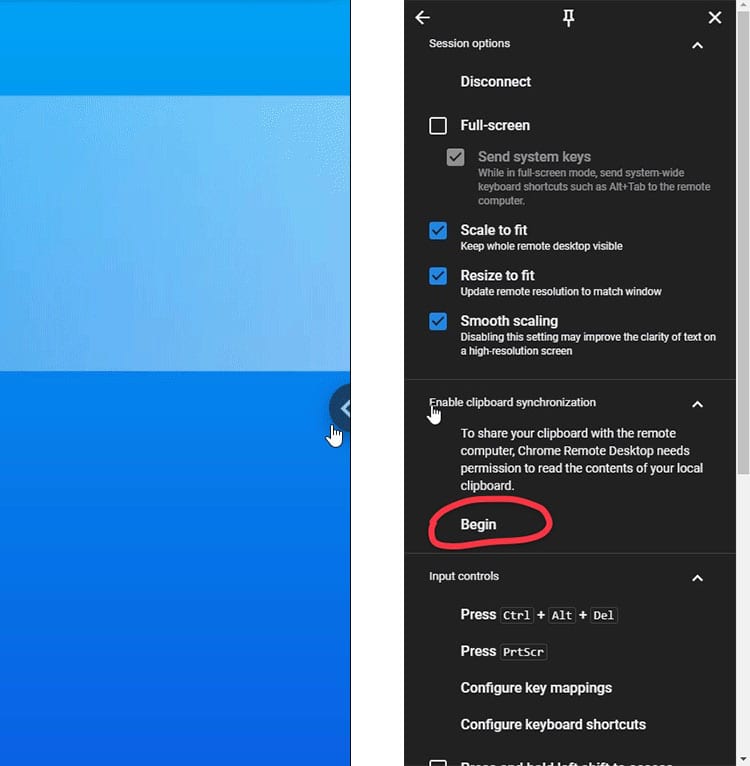
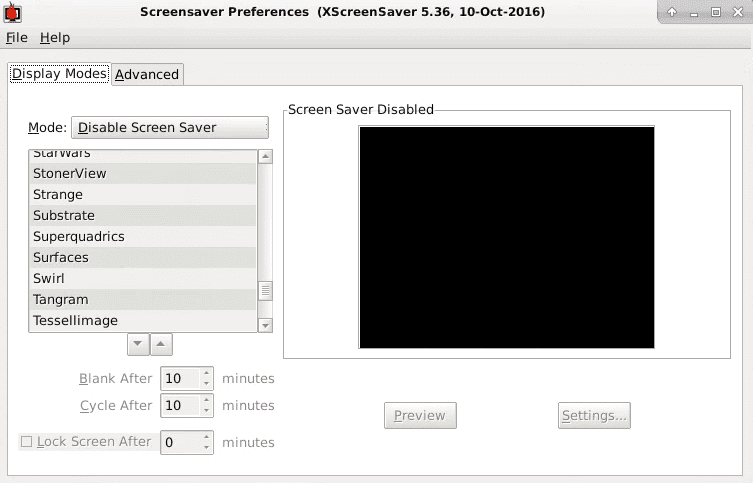
6.2. Disable screensavers, lock screens, and passwords
Because you’re accessing your desktop from a remote computer, it’s normally not necessary to use a screensaver or screen locker. Also, this is will improve performance.
- In the Applications menu, select Settings > Screensaver.
- Set Mode to Disable Screen Saver.
6.3. Troubleshooting: Check the status of the Chrome Remote Desktop service
If at any point the Chrome Remote Desktop service is not responding, you can check its status by using SSH to connect to the instance and running the following command:
$ sudo systemctl status chrome-remote-desktop@$USERIf the service is running, you see output that includes the state active:
chrome-remote-desktop.service - LSB: Chrome Remote Desktop service
    Loaded: loaded (/lib/systemd/system/[email protected]; enabled; vendor preset: enabled)
    Active: active (exited) since DATE_TIME; ELAPSED_TIME
To restart the service, use the following command in the SSH window:
$ sudo systemctl restart chrome-remote-desktop@$USER6.4. Re-enable the service
If you have mistakenly disabled connections to the remote instance in the client app, you can reconfigure the service and re-enable it by following the instructions I have showed in step 4.2.
Step 7: Install additional software
7.1. Install Chrome browser
$ wget https://dl.google.com/linux/direct/google-chrome-stable_current_amd64.deb

$ sudo apt install ./google-chrome-stable_current_amd64.deb
When prompted, enter your user password, and the installation will start.
7.2. Install Firefox Mozilla browser
sudo apt install firefox7.3. Install Midori browser, one of the lightest browser
sudo apt install midori7.4. Install Xarchiver
sudo apt install xarchiverNow you can use Google Remote Desktop to access your Xfce remote desktop on Ubuntu 20.04. Enjoy!
Useful Links:

